Introducing Feedlr. - the ultimate tool for feedback collection.

Hey Hashnoders 👋
I'm Ashik Chapagain, a web developer with a full-stack approach. Today, I'm really happy to introduce Feedlr, my first truly excellent product. Feedlr is my submission for Auth0 x Hashnode hackathon. Thanks, Auth0 and Hashnode for conducting this hackathon.
Index
- Introduction 🤔
- Features
- 💡 How to use Feedlr. (For web projects)?
- 💡 How to use Feedlr. in React Native?
- 💡 How to use Feedlr. in Flutter?
- How to use Feedlr by creating a custom form?
- ⚙️ How to customize the Feedlr. widget (For web)?
- 👨💻 Build with:
- 🔰 How did I get started?
- ☁️ Deploying
- 🛣️ Roadmap
- 🤝 Contributing
- 💬 Feedback
- Let's connect
Introduction 🤔
Feedlr. is the best tool for gathering consumer feedback. It includes a widget that allows consumers to submit feedback with or without an email address and without requiring a login. After your consumers give feedback, you may access the Feedlr. dashboard to view the feedback, the device information from which it was submitted, the time it was submitted, and the URL from which it was sent. Additionally, you may filter feedback by date range, reaction, operating system, browser, and device, as well as search for responses based on feedback and URL.
You can use Feedlr. in React Native and Flutter too
You can use your custom form and send post request to our server
Features
Easy to implement
Simply paste the given script tag from the
Installationssection to add the Feedlr widget to the head section of your site.<script src="https://feedlr.vercel.app/init.js"></script>Easy to customize
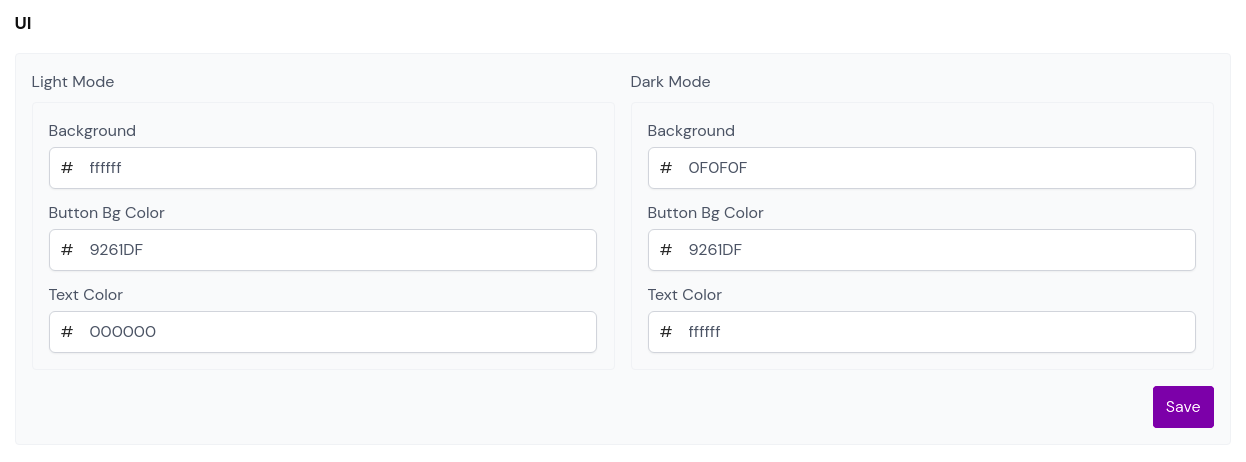
Feedlr. provide the customization from the dashboard and the script tag both. In the Feedlr. dashboard , you may go to the
Settingsmenu and under the UI area, you can change the appearance of the Widget. There are only a few choices now, but eventually, they will all be configurable. And head to theInstallationsection for available options of customization from the script tag.Dark Mode
Both web pages and the widget have a dark mode. For the dark mode in a widget, you must supply
data-mode="dark"to the script tag.
Device, OS, and Browser
Know from which device, OS, and browser the feedback was submitted.
Easy to use dashboard
Feedlr. provides easy to use dashboard for managing the feedback from your customers.
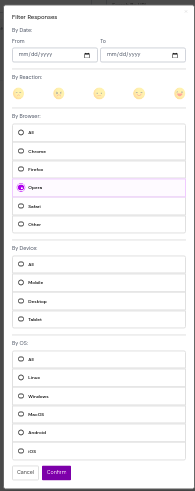
Filter Responses By Date Range, Reaction, Device, OS, and Browser
You can filter the feedback by date range, reaction, device, os, and browser from which that feedback was submitted.
Customize the Feedback question and Thankyou message
You can easily customize the feedback question and thank you message using the Feedlr dashboard.
Use your own custom form
Feedlr also allows you to use your own custom form. The only thing you have to do is to send the post request to the Feedlr api.
💡 How to use Feedlr. (For web projects)?
Using the Feedlr. is too much easy. Here are the steps to use:
- Register to Feedlr.
- Create a project using the site URL and site name.
- Then add the script provided by Feedlr. to the head tag of your site.
- Now, reload your website.
See the installation guide, for using the Feedlr.
You'll see the feedback button in the bottom corner of your site.
Here's a video of how to use Feedlr.
💡 How to use Feedlr. in React Native?
The widget of Feedlr. is currently not available in react native. But soon will be, until then, if you want to integrate Feedlr. in React Native Project. You have to send the post request with email(optional), feedback, emoji(disappointed|hate|natural|good|excellent)(optional), and your projectId to https://feedlr.vercel.app/api/responses.
const makeRequest = async () => {
      let request = await axios({
           method: "post",
               url: "https://feedlr.vercel.app/api/responses",
               data: {
                   email,
                   feedback,
                   emoji,
                   projectId: YOUR_PROJECT_ID
               },
      });
      if (request.data.success) {
          alert("reponse saved");
       } else {
           alert("some error have occured");
        }
};
This is how you can integrate Feedlr. in your react native.
💡 How to use Feedlr. in Flutter?
The widget of Feedlr. is currently not available in Flutter. But soon will be, until then, if you want to integrate Feedlr. in Flutter Project. You have to send the post request with email(optional), feedback, emoji(disappointed|hate|natural|good|excellent)(optional), and your projectId to https://feedlr.vercel.app/api/responses.
              Future<http.Response> createAlbum(String title) {
                return http.post(
                  Uri.parse('https://feedlr.vercel.app/api/responses'),
                  headers: <String, String>{
                    'Content-Type': 'application/json; charset=UTF-8',
                  },
                  body: jsonEncode(<String, String>{
                    'email': email,
                    'feedback': feedback,
                    'emoji': emoji,
                    'projectId': 3c7e4d59-f478-4dce-bdc0-7a879cac61c1
                  }),
                );
              }
This is how you can integrate Feedlr. in your Flutter.
How to use Feedlr by creating a custom form?
For the custom form too. you need to send your request to our api.
<form action="https://feedlr.vercel.app/api/responses" method="post">

<label for="disappointed">
    Disappointed
    <input type="radio" name="emoji" value="disappointed">
</label>
<label for="hate">
    hate
    <input type="radio" name="emoji" value="hate">
</label>
<label for="natural">
    natural
    <input type="radio" name="emoji" value="natural">
</label>
<label for="good">
    good
    <input type="radio" name="emoji" value="good">
</label>
<label for="excellent">
    excellent
    <input type="radio" name="emoji" value="excellent">
</label>

<input type="email" placeholder="Email">
<input type="text" placeholder="Feedback" name="feedback" required>
<input type="hidden" name="projectId" value="YOUR_PROJECT_ID">
<input type="submit" value="Submit">

</form>
⚙️ How to customize the Feedlr. widget (For web)?
From Dashboard
You can customize the widget view from the dashboard. Just head to the settings of the project and check the UI section. From there you can change the colors of text, buttons, and background of the widget for dark and light mode.
Using script tag
Yes, you can customize the look of the widget from the script tag itself.
| Options | Description | Usage |
data-mode | Enable Dark Mode In the widget | <script data-mode='dark' src='https://feedlr.vercel.app/init.js'></script> |
data-position-right | How much you want to move widget from right. | <script data-position-right='20' src='https://feedlr.vercel.app/init.js'></script> |
data-position-bottom | How much you want to move widget from bottom. | <script data-position-bottom='20' src='https://feedlr.vercel.app/init.js'></script> |
data-input-style | Change the default style of email and feedback field. | <script data-input-styele='border-radius:10%' src='https://feedlr.vercel.app/init.js'></script> |
data-toggler-style | Override the default style of toggler button. | <script data-position-right='20' src='https://feedlr.vercel.app/init.js'></script> |
data-submit-style | Change the look of submit button as you want | <script data-submit-style='border-radius:50%;' src='https://feedlr.vercel.app/init.js'></script> |
You can add all these options in a single script tag.
👨💻 Build with:
- TypeScript: Programming Language
- Next.JS: Production-ready react framework
- Auth0: Complete user authentication
- Supbase: Postgres Database
- Prisma: Typescript ORM
- react-icons: For icons
- nextjs-progressbar: Progress Bar
- headless-ui: For components
- Radix UI: For components
- TailwindCSS: For styling
- Tippy.JS: For Tooltip
- next-themes: For dark theme
- next-useragent: For parsing user agent
- react-hot-toast: For notification toast
- react-loading-skeleton: For skeleton loading
- swr: For data fetching
🔰 How did I get started?
The first few days were challenging for me since I was trying to come up with a concept for this hackathon. Then, when I got the idea of this project. I began gathering the necessary materials right after that. Once I've finished my research, I know exactly how it should look. To begin, I created a new project with Next.js and TypeScript.
yarn create next-app feedlr --typescript
Then, I implemented Auth0 in this project. Auth0 was very easy to implement. Just added the nextjs-auth0 package by following the command.
yarn install @auth0/nextjs-auth0
and wrapped the <Component/> with <UserProvider> in pages/_app.tsx.
import { UserProvider } from '@auth0/nextjs-auth0';
...
 <UserProvider>
           <Component {...pageProps} />
</UserProvider>
...
and created [...auth0].ts file inside api/auth folder and added the following code.
import { handleAuth } from '@auth0/nextjs-auth0';

export default handleAuth();
Then added the AUTH0 configurations in .env.local.
AUTH0_SECRET= YOUR_AUTH0_SECRET
AUTH0_BASE_URL= YOUR_AUTH0_BASE_URL
AUTH0_ISSUER_BASE_URL= YOUR_AUTH0_ISSUER_BASE_URL
AUTH0_CLIENT_ID= YOUR_AUTH0_CLIENT_ID
AUTH0_CLIENT_SECRET= YOUR_AUTH0_CLIENT_SECRET
Wow, the authentication is completed. Now, users can log in from http://localhost:3000/api/auth/login and log out from http://localhost:3000/api/auth/logout.
This is how I got started on my project.
☁️ Deploying
As always, Vercel was my friend for hosting this site too. I started a new project in Vercel and connected GitHub repo with that Vercel project and all done.
Now, you can use it from https://feedlr.vercel.app.
🛣️ Roadmap
Feedlr. is the hardest project of my life because I have gained a tremendous amount of knowledge in a field in which I had no prior expertise. I am planning to take Feedlr. to another level by adding other more features in the future (I'm currently working on some of them).
Here's a rundown of upcoming Feedlr. features that will be available soon:
- Receive a weekly overview of feedback in an email
- Be alerted on the Discord server when feedback is received
- Inline widgets
- Capture a snapshot of the webpage
- Documentation Site
There are many more on the list that will soon be accessible in Feedlr.
🤝 Contributing
- Please contribute using GitHub Flow . Create a branch, add commits, and open a pull request.
License under MIT
💬 Feedback
Feedback is the best way to improve projects. This is why Feedlr. was born. So, you can also give your feedback in the comment section or from our site. On our site, there is a feedback button on the bottom corner, from there you can send us feedback. Feedlr. has integrated its own feedback widget for taking feedback. So, you can see, how's the widget.


