

Stripe Checkout With Next.js - The Complete Guide
Learn how to use Stripe Checkout with Next.js. Step by step.


Hello world
My name is Ashik Chapagain.
- A full-stack web developer
- Content Creator
- College student
- Nepalese
I'll walk you through the entire process of using Stripe Checkout with Next.js in this article.
Index
Introduction
Let's see the brief introduction of Stripe and Stripe Checkout.
Stripe: Stripe is an online payment processing and credit card processing platform for businesses.
Stripe Checkout: Stripe Checkout is prebuilt, hosted payment page optimized for conversion.
Demo
Live Preview: https://stripe-checkout-next-js-demo.vercel.app/
Github: https://github.com/projectashik/stripe-checkout-next-js-demo
Let's Build
Installation
As mentioned in the title, we'll be using Next.js for building this.
For Next.js to work, we need to have Node.js and npm installed.
So, first, install Node.js if you haven't yet. You can follow the following guides to install Node.js.
Optional:
If you want to use yarn, install it using npm.
npm install --global yarn
Now, create a new Next.js app.
npx create-next-app stripe-checkout

yarn create next-app stripe-checkout
I have used tailwindcss for styling the components. So, let's install tailwindcss too.
yarn add --dev tailwindcss@latest postcss@latest autoprefixer@latest

npm install -D tailwindcss@latest postcss@latest autoprefixer@latest
Then run the following command to create tailwindcss config file and postcss config file.
npx tailwindcss init -p
Now open the project in your favorite text editor or IDE (Integrated Development Environment).
For me, it's Visual Studio Code .
# Run the following command to open the project in VS Code.
code .
Now, open tailwind.config.js and update purge option and add mode: 'jit'.
// tailwind.config.js

module.exports = {
  purge: ['./pages/**/*.{js,ts,jsx,tsx}', './components/**/*.{js,ts,jsx,tsx}'],
  mode: 'jit',
  ...
};
Then, open styles/globals.css and remove all the content and add the following content.
@tailwind base;
@tailwind utilities;
@tailwind components;
Short Method: If you want to use the short process. Just run the following command.
npx create-next-app -e with-tailwindcss stripe-checkout
yarn create next-app -e with-tailwindcss stripe-checkout
Now, start the dev server and start coding.
yarn dev
npm run dev
Cleaning
Remove the main and footer tags from pages/index.js.
If you want to edit the title and description in the <Head> tag. Then you can.
// pages/index.js
import Head from 'next/head';
import Image from 'next/image';
import styles from '../styles/Home.module.css';

export default function Home() {
  return (
    <div className={styles.container}>
      <Head>
        <title>Stripe Checkout with Next.js</title>
        <meta name='description' content='Complete Step By Step Tutorial for integrating Stripe Checkout with Next.js' />
        <link rel='icon' href='/favicon.ico' />
      </Head>
    </div>
  );
}
And remove all the styles except for .container in styles/Home.module.css.
/* styles/Home.module.css */
.container {
  min-height: 100vh;
  padding: 0 0.5rem;
  display: flex;
  flex-direction: column;
  justify-content: center;
  align-items: center;
  height: 100vh;
}
Making UI
First, we'll build an index page in which we'll have one item that users can purchase.
Let's add details of an item to an object.
// pages/index.js

const [item, setItem] = useState({
    name: 'Apple AirPods',
    description: 'Latest Apple AirPods.',
    image:
      'https://images.unsplash.com/photo-1572569511254-d8f925fe2cbb?ixid=MnwxMjA3fDB8MHxwaG90by1wYWdlfHx8fGVufDB8fHx8&ixlib=rb-1.2.1&auto=format&fit=crop&w=1400&q=80',
    quantity: 0,
    price: 999,
  });
Don't forget to import the useState hook.
import { useState } from 'react';
Since we're using Unsplash for images, so we need to configure images.unsplash.com under the images section in next.config.js.
module.exports = {
  reactStrictMode: true,
  images: {
    domains: ['images.unsplash.com'],
  },
};
Now, let's display the following details in the UI and add buttons to increase and decrease the quantity users want to purchase.
In, pages/index.js
...
<main>
  <div className='shadow-lg border rounded p-2 '>
    <Image src={item.image} width={300} height={150} alt={item.name} />
    <h2 className='text-2xl'>$ {item.price}</h2>
    <h3 className='text-xl'>{item.name}</h3>
    <p className='text-gray-500'>{item.description}</p>
    <p className='text-sm text-gray-600 mt-1'>Quantity:</p>
    <div className='border rounded'>
      <button
        className='bg-blue-500 py-2 px-4 text-white rounded hover:bg-blue-600'
      >
        -
      </button>
      <input
        type='number'
        className='p-2'
        defaultValue={item.quantity}
      />
      <button
        className='bg-blue-500 py-2 px-4 text-white rounded hover:bg-blue-600'
      >
        +
      </button>
    </div>
    <p>Total: ${item.quantity * item.price}</p>
    <button
      disabled={item.quantity === 0}
      className='bg-blue-500 hover:bg-blue-600 text-white block w-full py-2 rounded mt-2 disabled:cursor-not-allowed disabled:bg-blue-100'
    >
      Buy
    </button>
  </div>
</main>
...
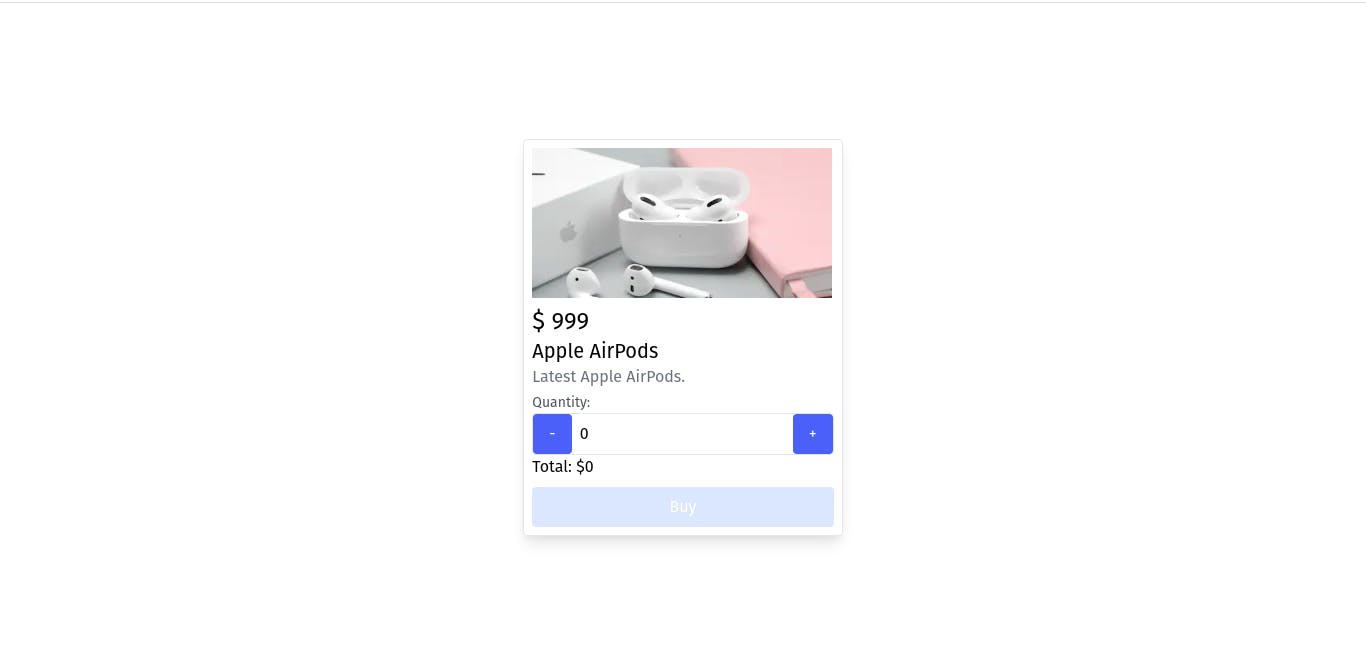
Now your page should look like this.
Now, let's make the button to increase and decrease the quantity working.
Now, we'll create the onQuantityPlus and onQuantityMinus functions to increase and decrease the item quantity on button clicks.
const changeQuantity = (value: number) => {
  // Don't allow the quantity less than 0, if the quantity is greater than value entered by user then the user entered quantity is used, else 0
  setItem({ ...item, quantity: Math.max(0, value) });
};

const onQuantityPlus = () => {
  changeQuantity(item.quantity + 1);
};

const onQuantityMinus = () => {
  changeQuantity(item.quantity - 1);
};
Now, add this function in the onClick event of the respective buttons.
...
<button
  onClick={onQuantityMinus}
  className='bg-blue-500 py-2 px-4 text-white rounded hover:bg-blue-600'
>
  -
</button>
...
<button
  onClick={onQuantityPlus}
  className='bg-blue-500 py-2 px-4 text-white rounded hover:bg-blue-600'
>
  +
</button>
...
Now, let's add the onChange event on the input field to update the value of the item quantity and also don't forget to change defaultValue to value.
...
<input
  type='number'
  className='p-2'
  onChange={onInputChange}
  value={item.quantity}
/>
...
Now, let's create onInputChange function.
...
//
const onInputChange = (e) => {
    changeQuantity(parseInt(e.target.value));
};
...
Creating the Backend
First, we'll start by installing the stripe library.
yarn add stripe
npm install stripe
Now, let's add the required environment variables.
Create a new file .env.local in the root directory with the following data.
NEXT_PUBLIC_STRIPE_PUBLISHABLE_KEY=YOUR_STRIPE_PUBLISHABLE_KEY
STRIPE_SECRET_KEY=YOUR_STRIPE_SECRET_KEY
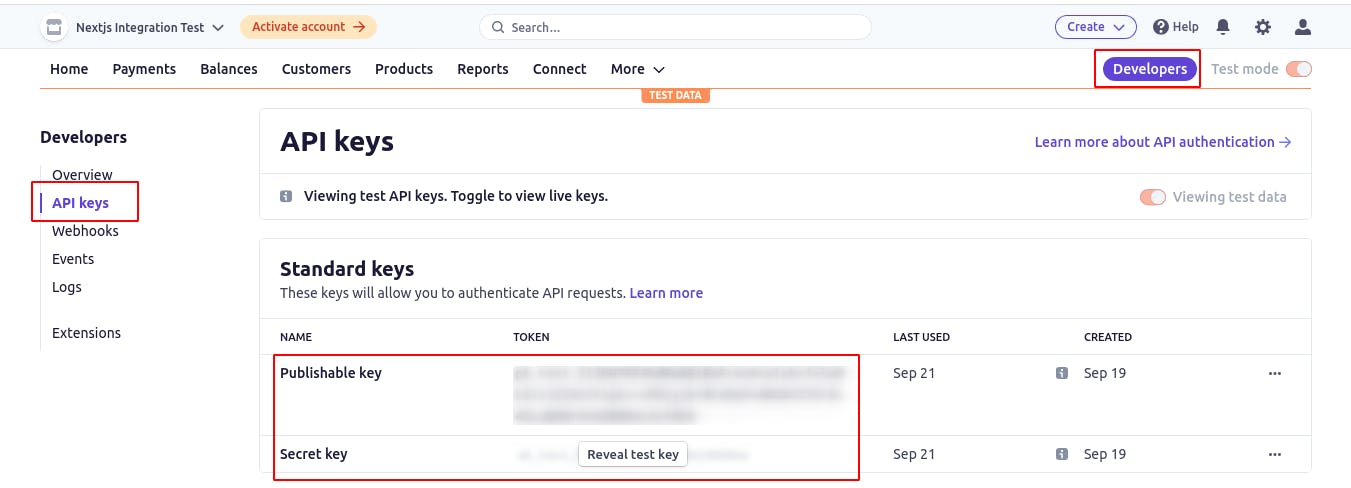
You can get these credentials from Dashboard -> Developers -> API Keys.
Now, we need to build an API to get the session id that is required for redirecting the user to the checkout page.
Create a new file in api/create-stripe-session.js. And add the following.
const stripe = require("stripe")(process.env.STRIPE_SECRET_KEY);

export default async (req, res) => {
  const { item } = req.body;
};
Here, we are getting item details via a post method that we will call on the front end.
Creating the shape for the item needed by Stripe.
There is a particular type of object which Stripe expects to get, this is the object. You should use your local currency instead of "usd" if you want.
const transformedItem = {
    price_data: {
      currency: 'usd',
      product_data: {
        images: [item.image],
        name: item.name,
      },
      unit_amount: item.price * 100,
    },
    description: item.description,
    quantity: item.quantity,
  };
Creating Stripe Session in the backend:
You will need to create a stripe session object where you need to define some data.
const session = await stripe.checkout.sessions.create({
  payment_method_types: ['card'],
  line_items: [transformedItem],
  mode: 'payment',
  success_url: redirectURL + '?status=success',
  cancel_url: redirectURL + '?status=cancel',
  metadata: {
    images: item.image,
  },
});

res.json({ id: session.id });
payment_method_type: In this, we add the payment methods to pay the price of the product. Click here to know more payment methods.success_url: In success_url, you define where the user will go after the payment is successful.cancel_url: In the cancel_url, you define where the user will go if the user clicks the back button. It can be a cancel page or the checkout page as well.metadata: In metadata, we will add images of the product, if you want you can add other options too.
For other options, click here to know.
Now, the final create-stripe-session.js file should look like this.
const stripe = require('stripe')(process.env.STRIPE_SECRET_KEY);

async function CreateStripeSession(req, res) {
  const { item } = req.body;

  const redirectURL =
    process.env.NODE_ENV === 'development'
      ? 'http://localhost:3000'
      : 'https://stripe-checkout-next-js-demo.vercel.app';

  const transformedItem = {
    price_data: {
      currency: 'usd',
      product_data: {
        images: [item.image],
        name: item.name,
      },
      unit_amount: item.price * 100,
    },
    description: item.description,
    quantity: item.quantity,
  };

  const session = await stripe.checkout.sessions.create({
    payment_method_types: ['card'],
    line_items: [transformedItem],
    mode: 'payment',
    success_url: redirectURL + '?status=success',
    cancel_url: redirectURL + '?status=cancel',
    metadata: {
      images: item.image,
    },
  });

  res.json({ id: session.id });
}

export default CreateStripeSession;
Now, our backend is ready, now we have to send a POST request to API to get the session.
Redirecting to Stripe Checkout Page
For redirecting to Stripe Checkout Page. We have to install the following libraries.
yarn add @stripe/stripe-js axios
npm install @stripe/stripe-js axios
First, we'll first create a stripePromise variable.
const publishableKey = process.env.NEXT_PUBLIC_STRIPE_PUBLISHABLE_KEY;
const stripePromise = loadStripe(publishableKey);
Now, we'll create createCheckoutSession function to get the Stripe Session for the checkout.
const createCheckOutSession = async () => {
  const stripe = await stripePromise;
  const checkoutSession = await axios.post('/api/create-stripe-session', {
    item: item,
  });
  const result = await stripe.redirectToCheckout({
    sessionId: checkoutSession.data.id,
  });
  if (result.error) {
    alert(result.error.message);
  }
};
Don't forget to import loadStripe and axios.
import { loadStripe } from '@stripe/stripe-js';
import axios from 'axios';
Now, we have to call this function while the user clicks the Buy button.
And onClick={createCheckoutSession}
<button
  disabled={item.quantity === 0}
  onClick={createCheckOutSession}
  className='bg-blue-500 hover:bg-blue-600 text-white block w-full py-2 rounded mt-2 disabled:cursor-not-allowed disabled:bg-blue-100'
>
  Buy
</button>
Now, let's test the checkout.
Since we have updated next.config.js and added the .env.local file, so restart the dev server.
yarn dev
npm run dev
Now, the result should look like this.
Displaying Success and Cancel Message
If you guys remember, then we have used ?status= query parameter in success_url and cancel_url.
// pages/api/create-stripe-session.js
...
const session = await stripe.checkout.sessions.create({
    ...
    success_url: redirectURL + '?status=success',
    cancel_url: redirectURL + '?status=cancel',
    ...
  });

...
So, with this query parameter, we'll know, whether the payment is successful or canceled. And show the respective message.
First, let's fetch the status.
// pages/index.js

import { useRouter } from 'next/router';

...
const router = useRouter();
const { status } = router.query;
Now, add the following below the starting main tag, to display the message.
// pages/index.js

{status && status === 'success' && (
  <div className='bg-green-100 text-green-700 p-2 rounded border mb-2 border-green-700'>
    Payment Successful
  </div>
)}
{status && status === 'cancel' && (
  <div className='bg-red-100 text-red-700 p-2 rounded border mb-2 border-red-700'>
    Payment Unsuccessful
  </div>
)}
Now, the result should be like this.

Our app took some time to assign a stripe session. So, during that time, let's display Processing... instead of Buy inside the button as shown in the demo.
For that,
Create a new state named loading with default value false.
const [loading, setLoading] = useState(false);
Then, update loading value to true, while creating Stripe Session. and again update loading value to false when the stripe session is created.
const createCheckOutSession = async () => {
  setLoading(true);
  ...
  setLoading(false);
};
And now, update the Buy Button.
<button
  disabled={item.quantity === 0 || loading}
  onClick={createCheckOutSession}
  className='bg-blue-500 hover:bg-blue-600 text-white block w-full py-2 rounded mt-2 disabled:cursor-not-allowed disabled:bg-blue-100'
>
  {loading ? 'Processing...' : 'Buy'}
</button>
Here, we're disabling the button while loading and displaying Processing... while loading.
Now, the result should be following:
All done.
Files
At last, your pages/index.js file should look like below:
import Head from 'next/head';
import Image from 'next/image';
import styles from '../styles/Home.module.css';
import { useState } from 'react';
import { loadStripe } from '@stripe/stripe-js';
import axios from 'axios';
import { useRouter } from 'next/router';

export default function Home() {
  const router = useRouter();
  const { status } = router.query;

  const [loading, setLoading] = useState(false);

  const [item, setItem] = useState({
    name: 'Apple AirPods',
    description: 'Latest Apple AirPods.',
    image:
      'https://images.unsplash.com/photo-1572569511254-d8f925fe2cbb?ixid=MnwxMjA3fDB8MHxwaG90by1wYWdlfHx8fGVufDB8fHx8&ixlib=rb-1.2.1&auto=format&fit=crop&w=1400&q=80',
    quantity: 0,
    price: 999,
  });

  const changeQuantity = (value) => {
    // Don't allow the quantity less than 0, if the quantity is greater than value entered by user then the user entered quantity is used, else 0
    setItem({ ...item, quantity: Math.max(0, value) });
  };

  const onInputChange = (e) => {
    changeQuantity(parseInt(e.target.value));
  };

  const onQuantityPlus = () => {
    changeQuantity(item.quantity + 1);
  };

  const onQuantityMinus = () => {
    changeQuantity(item.quantity - 1);
  };

  const publishableKey = process.env.NEXT_PUBLIC_STRIPE_PUBLISHABLE_KEY;
  const stripePromise = loadStripe(publishableKey);
  const createCheckOutSession = async () => {
    setLoading(true);
    const stripe = await stripePromise;
    const checkoutSession = await axios.post('/api/create-stripe-session', {
      item: item,
    });
    const result = await stripe.redirectToCheckout({
      sessionId: checkoutSession.data.id,
    });
    if (result.error) {
      alert(result.error.message);
    }
    setLoading(false);
  };
  return (
    <div className={styles.container}>
      <Head>
        <title>Stripe Checkout with Next.js</title>
        <meta
          name='description'
          content='Complete Step By Step Tutorial for integrating Stripe Checkout with Next.js'
        />
        <link rel='icon' href='/favicon.ico' />
      </Head>
      <main>
        {status && status === 'success' && (
          <div className='bg-green-100 text-green-700 p-2 rounded border mb-2 border-green-700'>
            Payment Successful
          </div>
        )}
        {status && status === 'cancel' && (
          <div className='bg-red-100 text-red-700 p-2 rounded border mb-2 border-red-700'>
            Payment Unsuccessful
          </div>
        )}
        <div className='shadow-lg border rounded p-2 '>
          <Image src={item.image} width={300} height={150} alt={item.name} />
          <h2 className='text-2xl'>$ {item.price}</h2>
          <h3 className='text-xl'>{item.name}</h3>
          <p className='text-gray-500'>{item.description}</p>
          <p className='text-sm text-gray-600 mt-1'>Quantity:</p>
          <div className='border rounded'>
            <button
              onClick={onQuantityMinus}
              className='bg-blue-500 py-2 px-4 text-white rounded hover:bg-blue-600'
            >
              -
            </button>
            <input
              type='number'
              className='p-2'
              onChange={onInputChange}
              value={item.quantity}
            />
            <button
              onClick={onQuantityPlus}
              className='bg-blue-500 py-2 px-4 text-white rounded hover:bg-blue-600'
            >
              +
            </button>
          </div>
          <p>Total: ${item.quantity * item.price}</p>
          <button
            disabled={item.quantity === 0 || loading}
            onClick={createCheckOutSession}
            className='bg-blue-500 hover:bg-blue-600 text-white block w-full py-2 rounded mt-2 disabled:cursor-not-allowed disabled:bg-blue-100'
          >
            {loading ? 'Processing...' : 'Buy'}
          </button>
        </div>
      </main>
    </div>
  );
}
And pages/api/create-stripe-sessoin.js should look like this.
const stripe = require('stripe')(process.env.STRIPE_SECRET_KEY);

async function CreateStripeSession(req, res) {
  const { item } = req.body;

  const redirectURL =
    process.env.NODE_ENV === 'development'
      ? 'http://localhost:3000'
      : 'https://stripe-checkout-next-js-demo.vercel.app';

  const transformedItem = {
    price_data: {
      currency: 'usd',
      product_data: {
        images: [item.image],
        name: item.name,
      },
      unit_amount: item.price * 100,
    },
    description: item.description,
    quantity: item.quantity,
  };

  const session = await stripe.checkout.sessions.create({
    payment_method_types: ['card'],
    line_items: [transformedItem],
    mode: 'payment',
    success_url: redirectURL + '?status=success',
    cancel_url: redirectURL + '?status=cancel',
    metadata: {
      images: item.image,
    },
  });

  res.json({ id: session.id });
}

export default CreateStripeSession;
Conclusion
So, we have came to end. Hope you like this article. Please consider giving feedback on my writing.
Important Links
Credits
- Fireship Stripe Course
- Avneesh Agarwal Next.js Payment Article -https://blog.avneesh.tech/payments-in-next
Connect with me: