


In this article, we'll get to know the steps of authenticating a React application using Auth0 and Hasura, and we'll also build a Todo application using Apollo Client.
Let's start by configuring Auth0.
Configure Auth0
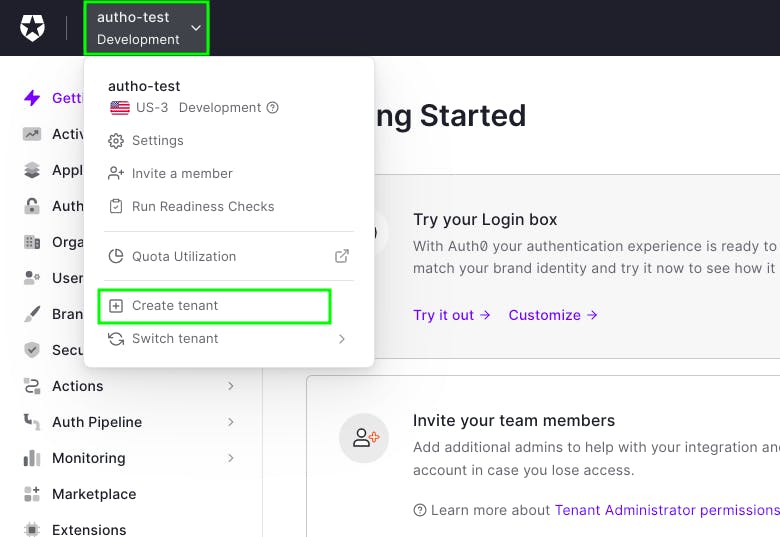
First head over to the auth0 dashboard and create a new tenant.
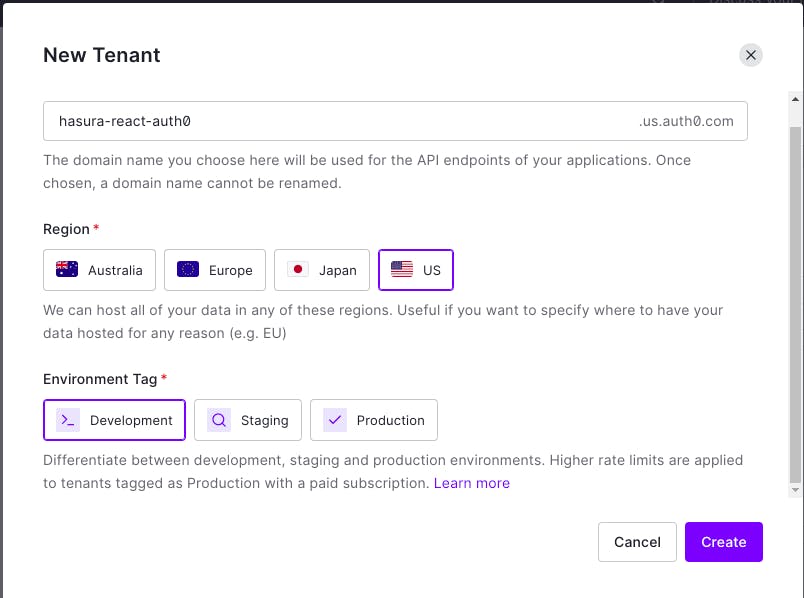
Give the tenant details and click Create.
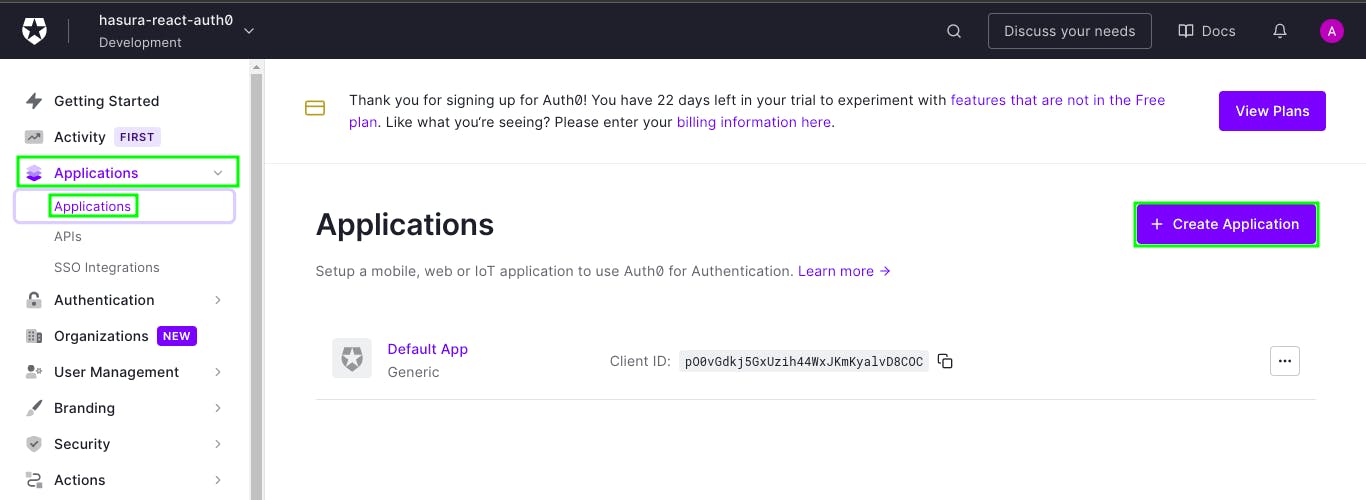
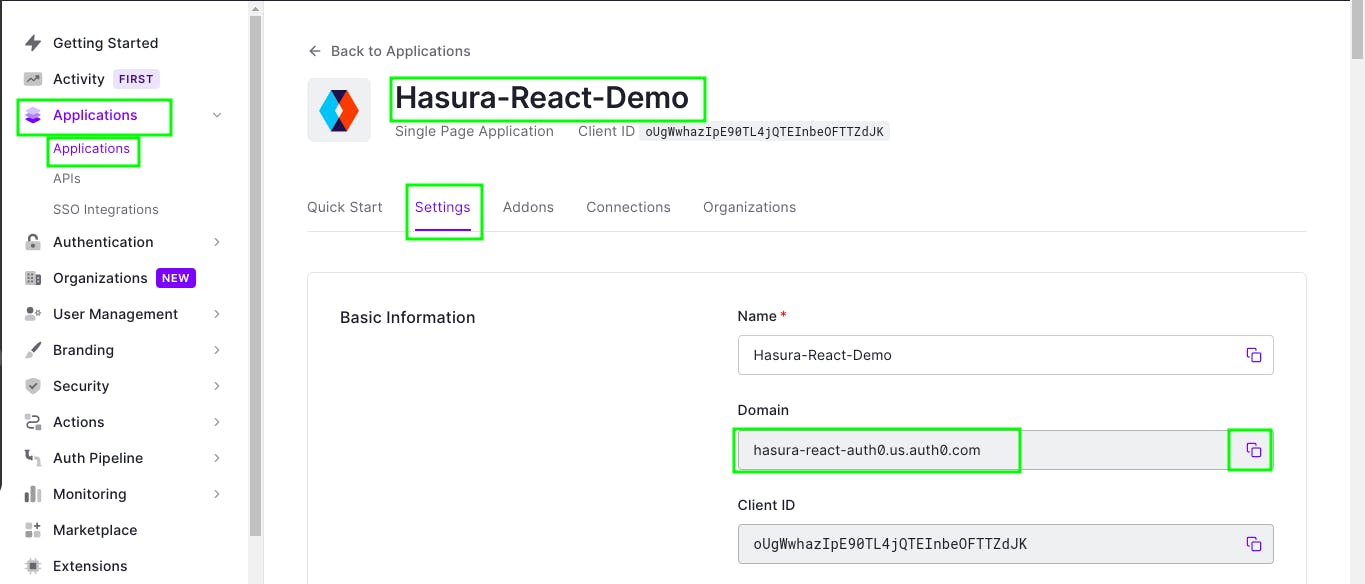
Now, once your tenant is ready, go to Applications > Applications and then click Create Application.
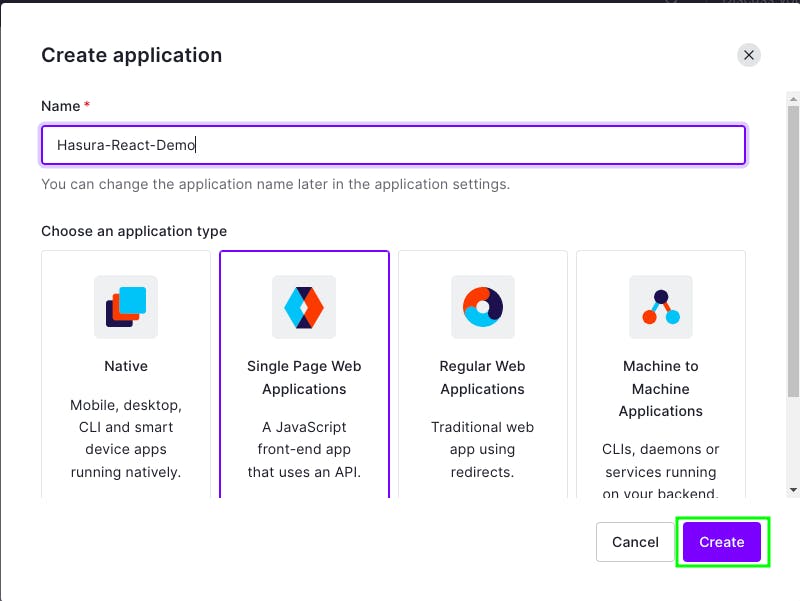
Then, give your application a name and choose Single Page Web Applications(because we're building in React).
Now, click Create.
Once your application is created, go to Settings and scroll down until you see Application URIs. Then add http://localhost:3000 to Allowed Callback URLs, Allowed Logout URLs, Allowed Web Origins, and Allowed Origins.
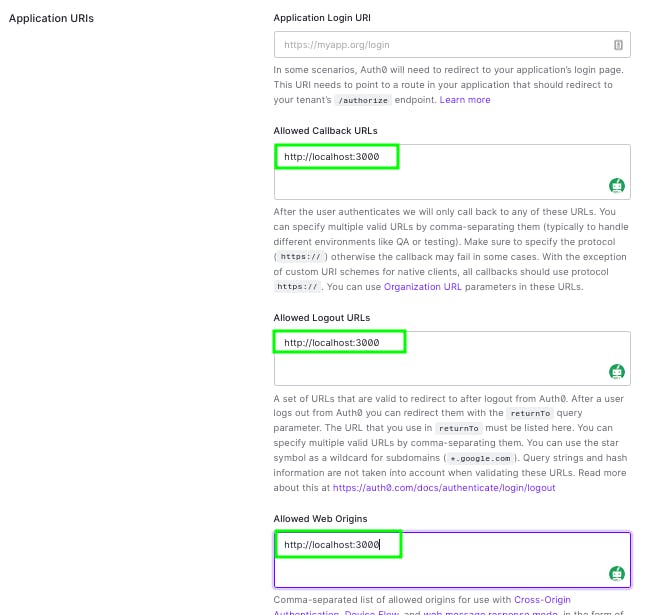
Scroll to the very bottom and hit Save Changes.
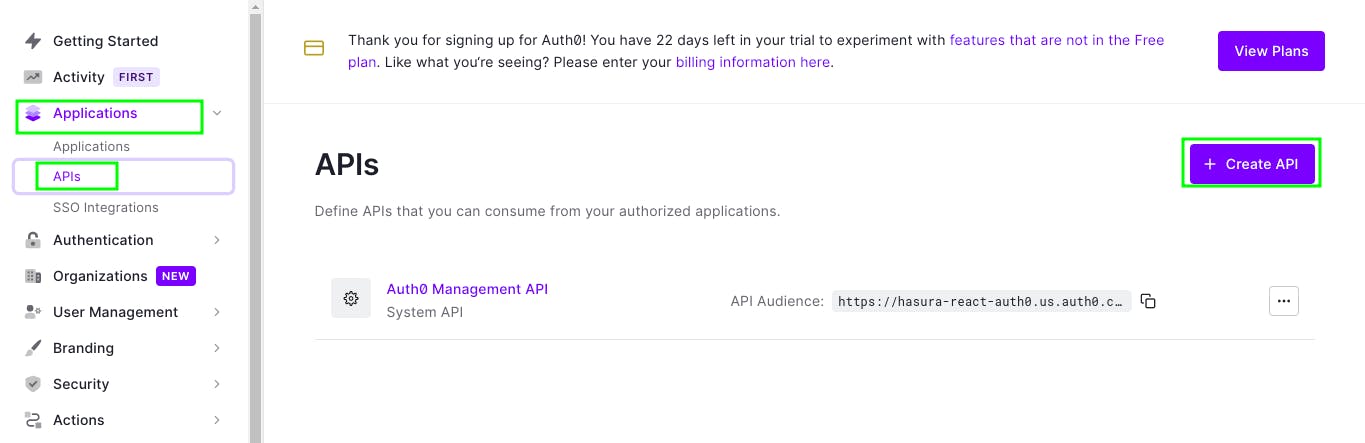
Now head over Applications > APIs and click Create API.
The JWT access token will be verified by this API.
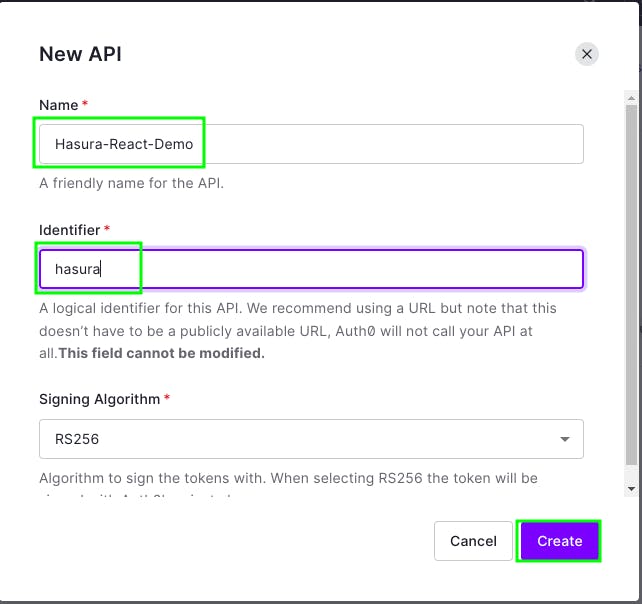
Now, give your API a name and also give it an identifier.
Later, we'll need to use the identifier name in our web application. If you give different name than mine, use that name when configuring in frontend.
Now, one last configuration for Auth0.
In order for Hasura to work with JWT, the JWT must contain x-hasura-allowed-roles,x-hasura-default-role,x-hasura-user-id. And in order to add this to JWT that Auth0 will return on successfull login, we'll have to create a login action flow.
To create a login action flow.
Go to Actions > Flow and then click Login.
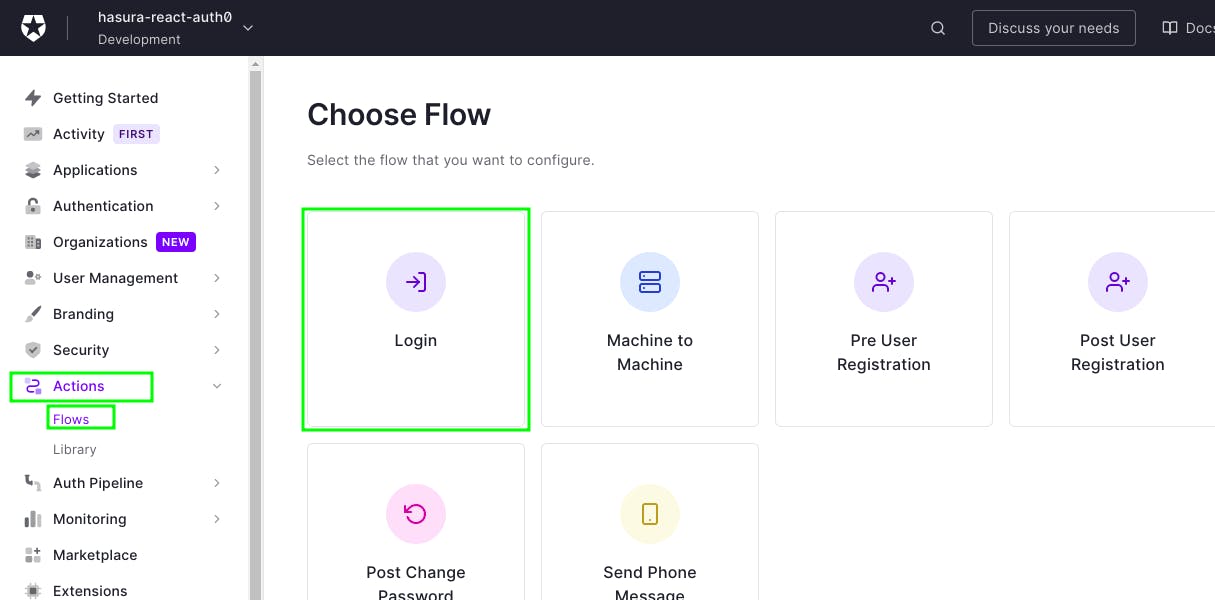
Now, click on Custom and click Create Action.
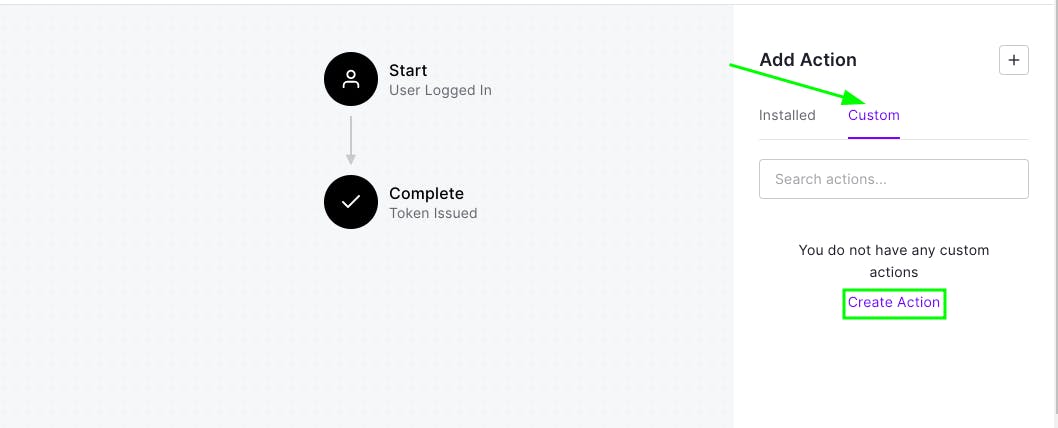
Now, give a name to a action and hit Create.
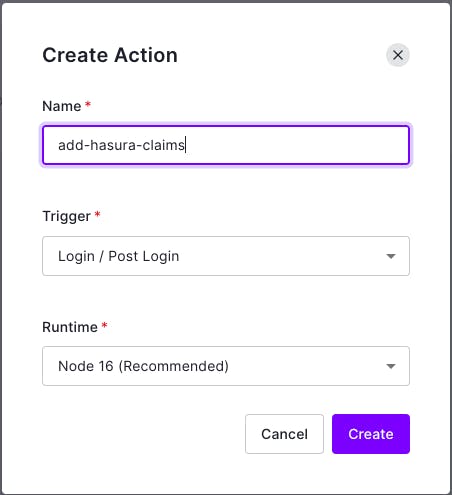
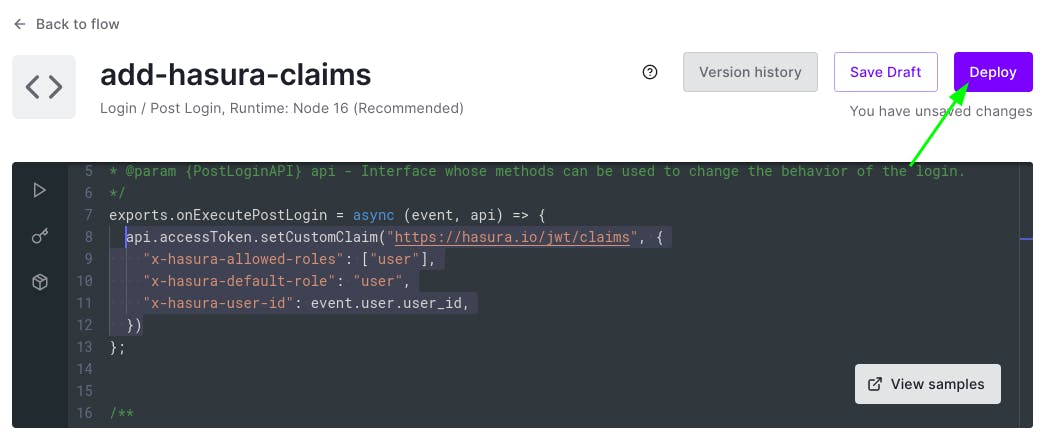
Add the following code inside onExecutePostLogin function and hit "deploy".
api.accessToken.setCustomClaim("https://hasura.io/jwt/claims", {
    "x-hasura-allowed-roles": ["user"],
    "x-hasura-default-role": "user",
    "x-hasura-user-id": event.user.user_id,
  })
Now, click on back to flow and then click on Custom and drag recently added Action and drop it in the middle of Start and Complete. Then click on Apply.
![Auth0 Action Flow] (cdn.hashnode.com/res/hashnode/image/upload/..)
Now, we're done with the Auth0 configuration. Later, we'll need Auth0 credentials, so, keep your Auth0 Dashboard open.
It's time to configure Hasura.
Configuring Hasura
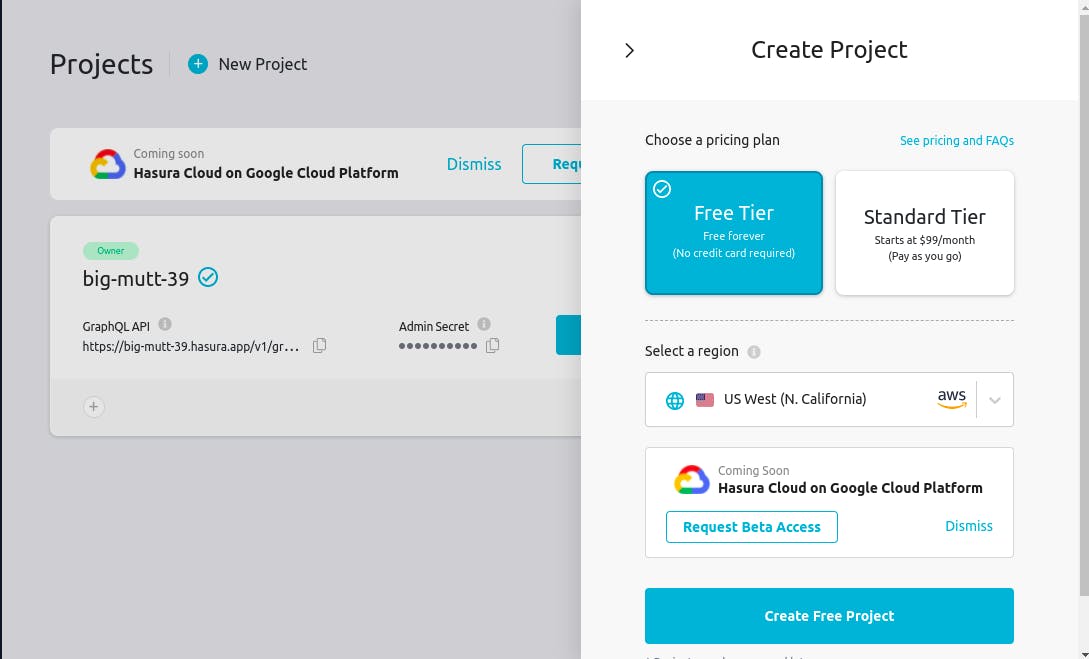
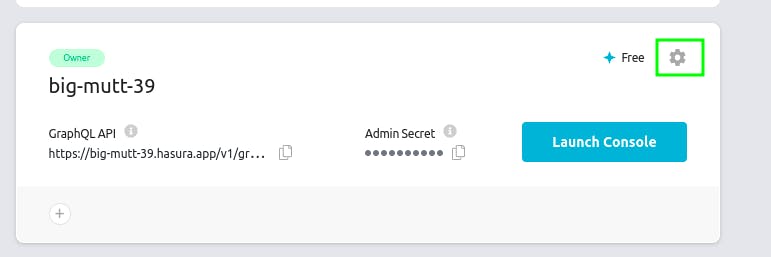
Head over to Hasura Cloud, and create a new project if you haven't yet.
Now, click on Settings icon of the newly created project.
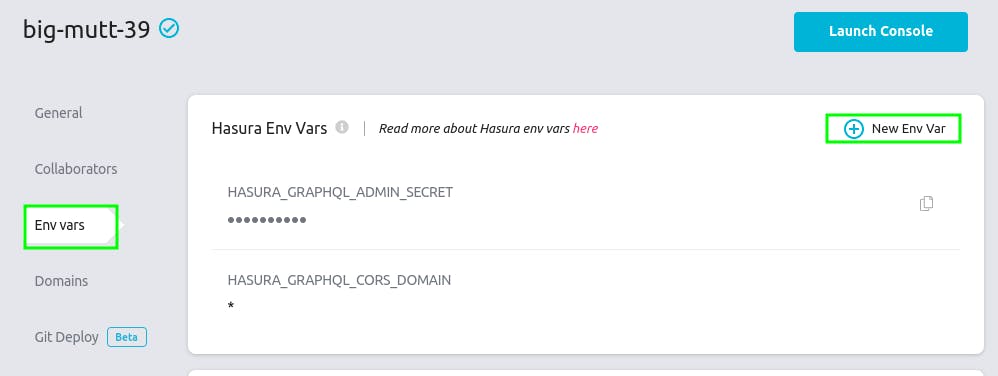
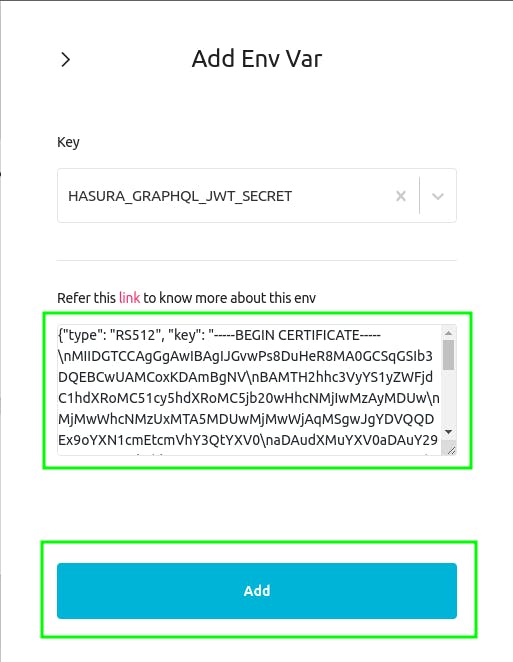
Once you're inside the Project Dashboard. Click on Env Vars. Then click on New Env Var.
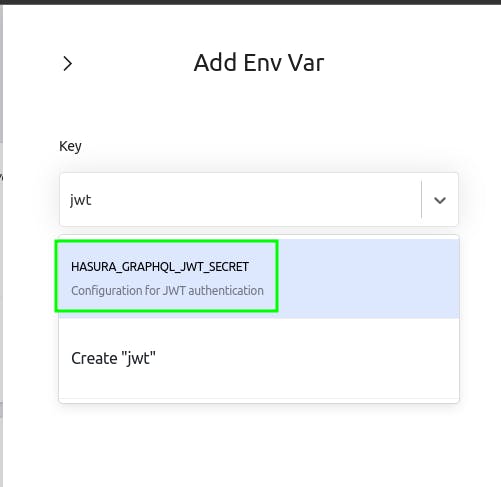
Now, in the key field search for jwt and choose HASURA_GRAPHQL_JWT_SECRET.
Now, go to this link to generate the JWT Secret.
Now, choose Auth0 as provider and add the auth0 domain from auth0 dashboard.
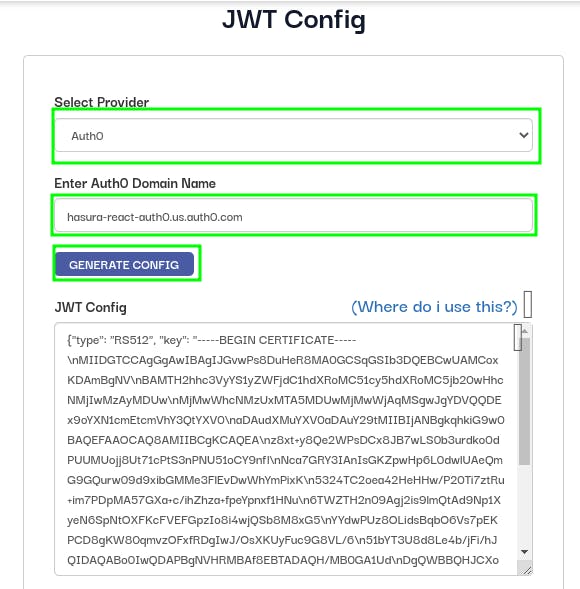
You can get the domain by heading to Auth0 Dashboard then click on Applications. Now click on Applications and then choose the recently created Single Page Application and then click on settings and you'll get the auth0 domain.
Now, copy the generated JWT Config and head over the hasura and paste it in the value field of env var. Then click on Add.
And if you have used the self hosted Hasura, then add the aboce details as the environment varaible there.
Now that the configuration is done, let's create a test todo app now.
Creating a react application and configure Auth0
Now, let's start by creating a new React app.
Run the folowing command to create a new react app.
yarn create react-app hasura-auth0
npx create-react-app hasura-auth0
Now, open the created application in an IDE, or code editor of your choice.
First, let's add all the required credentials in the .env file.
Create a .env file in the root of the application.
REACT_APP_AUTH0_DOMAIN=YOUR_SINGLE_PAGE_APPLICATION_DOMAIN
REACT_APP_AUTH0_CLIENTID=YOUR_SINGLE_PAGE_APPLICATION_CLIENTID
REACT_APP_AUTH0_AUDIENCE=YOUR_API_IDENTIFIER
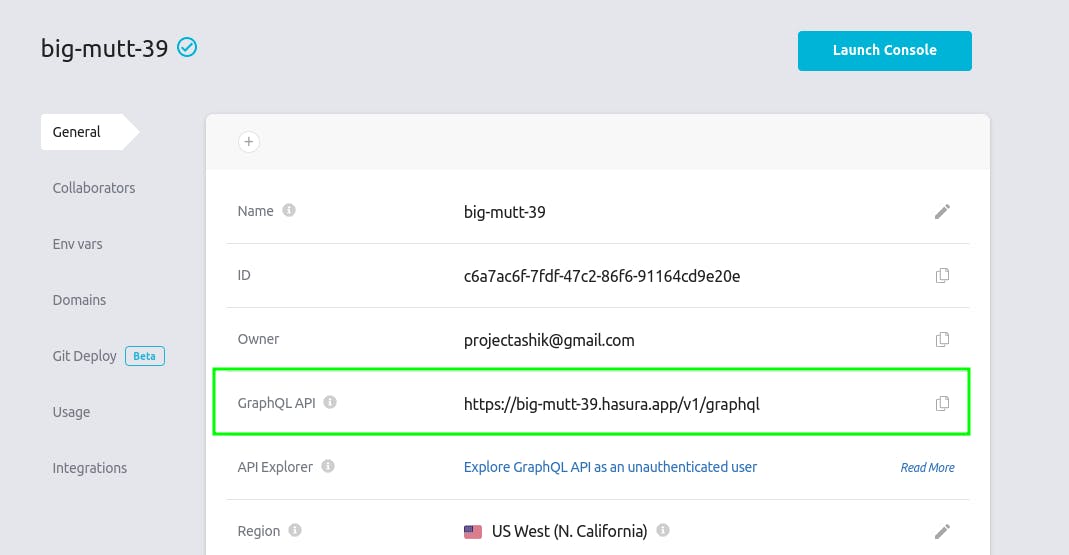
REACT_APP_HASURA_API=HASURA_GRAPHQL_API
You can get Auth0 details from Auth0 Dashboard > Applications > Applications > Recently created App > Settings.
You can get Auth0 identifier from Auth0 Dashboard > Applications > APIs > Recently created API > Settings.
You can get Hasura Api from Hasura Dashboard > Project Settings.
At first let's add Auth0 authentication to our application.
For that first we need to add @auth0/auth0-react package to our application.
Run following command to add.
yarn add @auth0/auth0-react
npm install @auth0/auth0-react --save
Now, wrap the <App/> component with Auth0Provider.
import { Auth0Provider } from "@auth0/auth0-react";
....

ReactDOM.render(
  <React.StrictMode>
    <Auth0Provider
      domain={process.env.REACT_APP_AUTH0_DOMAIN}
      clientId={process.env.REACT_APP_AUTH0_CLIENTID}
      audience={process.env.REACT_APP_AUTH0_AUDIENCE}
    >
      <App />
    </Auth0Provider>
  </React.StrictMode>,
  document.getElementById("root")
);
Now, remove everything from the App.js file and add the following.
import {Header} from './Header';
import {Todos} from './Todos';
import {CreateTodo} from './CreateTodo';


function App () {
  return (
    <>
    <header>
      <Header />
    </header>
    <main>
      <Todos />
      <CreateTodo />
    </main>
    </>
  )
}

export default App;
Now, let's create Header, Todos, and CreateTodo components.
Create a new js file named Header.js inside src/ folder and add the following content.
import { useAuth0 } from "@auth0/auth0-react";

export function Header() {
  const { user, isAuthenticated, isLoading, loginWithPopup, logout } =
    useAuth0();
  if (isLoading) return <div>Loading...</div>;
  return (
    <>
      {isAuthenticated && (
        <div>
          <p>Welcome, {user.email}</p>
          <button onClick={() => logout()}>Logout</button>
        </div>
      )}

      {!isAuthenticated && (
        <div>
          <p>You're not logged in.</p>
          <button onClick={() => loginWithPopup()}>Log in</button>
        </div>
      )}
    </>
  );
}
Now, the authentication is done.
This component will display user email, when user is logged in. And will display login button if the user is not logged in.
Now, create a file named Todos.js and add the following.
export function Todos() {
  return (
    <>
      <h1>Todos</h1>
      <ul>
        <li>
          Todo Title
          <button>Delete</button>
        </li>
      </ul>
    </>
  );
}
Then, create a file named CreateTodo.js and add the following.
export function CreateTodo() {
  return (
    <>
      <form>
        <input type="text" placeholder="Todo Title" />
        <button type="submit">Create</button>
      </form>
    </>
  );
}
Now, let's connect our app to Hasura Graphql API. For that we'll use Apollo Client.
Add the following packages to your application.
yarn add @apollo/client graphql
npm install @apollo/client graphql --save
Now, create a new file named AuthorizedApolloProvider.js and add the following content.
import {
  ApolloClient,
  ApolloProvider,
  createHttpLink,
  InMemoryCache,
} from "@apollo/client";
import { setContext } from "@apollo/client/link/context";
import { useAuth0 } from "@auth0/auth0-react";

export function AuthorizedApolloProvider({ children }) {
  const { getAccessTokenSilently, isLoading, isAuthenticated } = useAuth0();
  if (isLoading) return <div>Loading...</div>;
  const httpLink = createHttpLink({
    uri: process.env.REACT_APP_HASURA_API,
  });

  const authLink = setContext(async () => {
    if (isAuthenticated) {
      const token = await getAccessTokenSilently();
      return {
        headers: {
          authorization: `Bearer ${token}`,
        },
      };
    } else {
      return {};
    }
  });
  const apolloClient = new ApolloClient({
    link: authLink.concat(httpLink),
    cache: new InMemoryCache(),
  });
  return <ApolloProvider client={apolloClient}>{children}</ApolloProvider>;
}
Now, wrap the <App/> component in index.js with AuthorizedApolloProvider component.
import { AuthorizedApolloProvider } from "./AuthorizedApolloProvider";
...

ReactDOM.render(
  <React.StrictMode>
    <Auth0Provider
      domain={process.env.REACT_APP_AUTH0_DOMAIN}
      clientId={process.env.REACT_APP_AUTH0_CLIENTID}
      audience={process.env.REACT_APP_AUTH0_AUDIENCE}
    >
      <AuthorizedApolloProvider>
        <App />
      </AuthorizedApolloProvider>
    </Auth0Provider>
  </React.StrictMode>,
  document.getElementById("root")
);
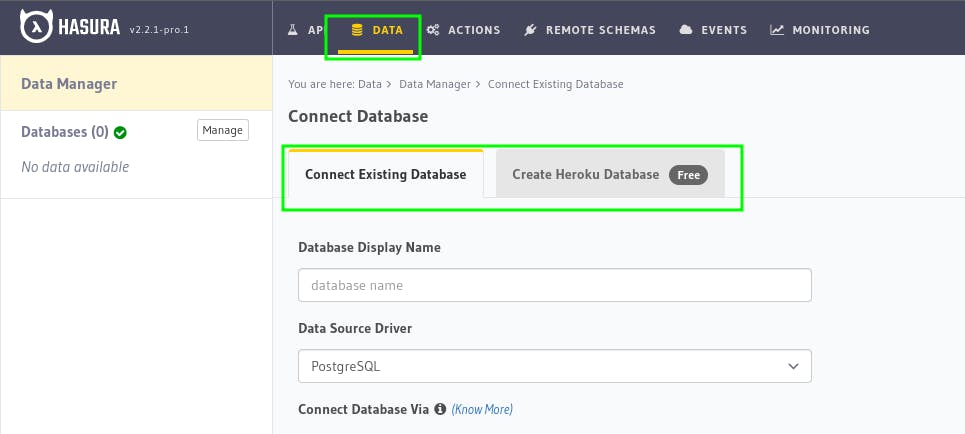
Database and permissions
Now, let's connect the database inHasura.
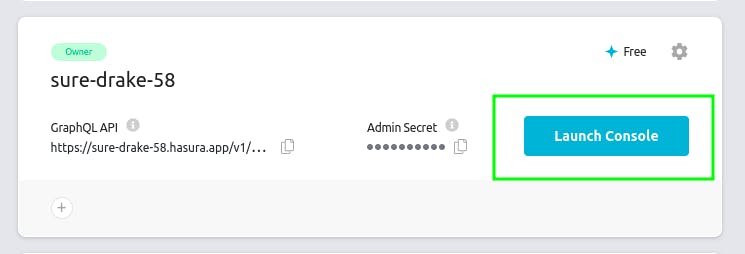
For this, head to Hasura cloud. Then click on Lunch Console, which is on the side of the project.
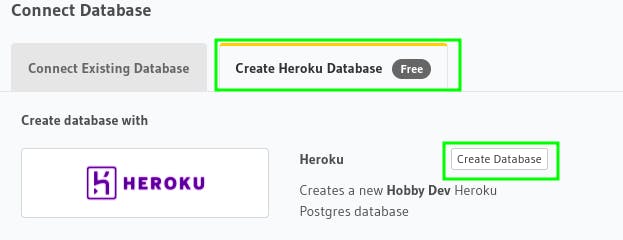
Then click on Data and fill up the database details, if you already have a database else, click on Create Heroku Database to create a postgres db.
I'll create a heroku database. So, once you click on Create Heroku Database. Click on Create Database and authenticate with your heroku account and database will be connected to Hasura.
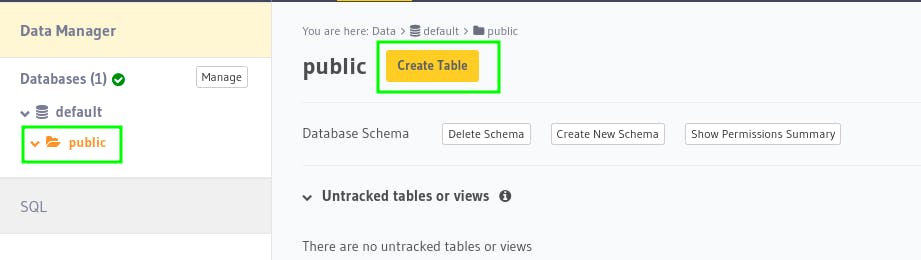
Now, let's create a todos table in database to store todos.
For that, click on public and click on Create Table.
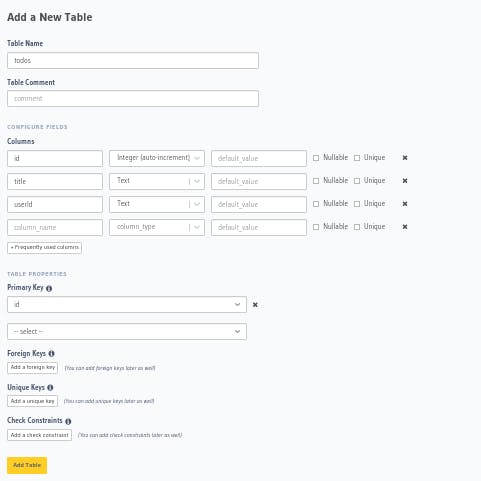
Now, fill the fields as shown in the figure below.
Once, your table is created, click on Permissions to add the permission for the user.
In the Enter new role field type user. Here we're adding user, because while configuring login action flow, we set default role as 'user'.
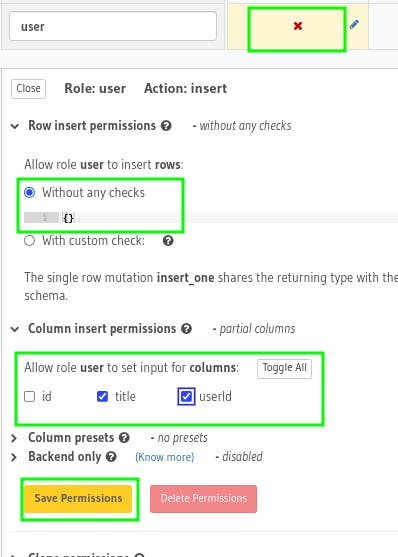
 Then, click on
 X icon under Insert section and now, we'll allow users to insert the todos without any checks and choose title and userId under Column insert permissions. Then hit Save Permissions.
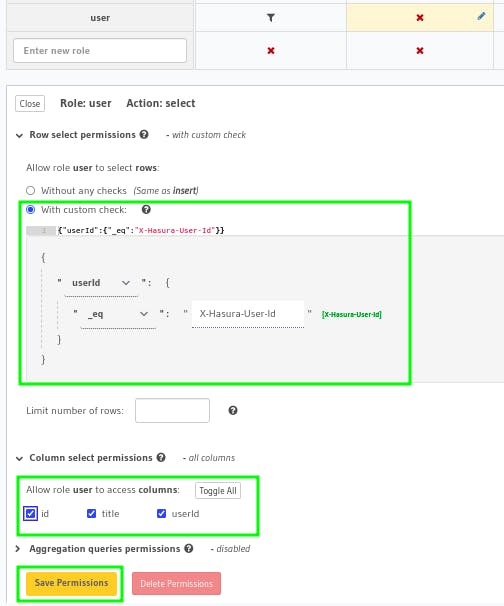
Now, we'll allow user's to fetch their own todos only, for that we need to set select permission.
So, under select section, click on X icon and then choose With custom checkand set userId equal to X-Hasura-User-Id. Then click toggle on under Column select permissions and hit permission.
In this application, we aren't working with update, so we're not setting the update permission, but if you want to allow user to update only those todos, which belongs to them only, then you need to choose With same custom checks as select under Pre-update check.
Now, since we're also deleting the todos, we'll allow user's to delete only thier own todos.
For that, under delete section, click on X icon and choose With same custom checks as select. And hit Save permissions.
Now, we're done with Database.
Building Todo
Let's fetch the todos, allow users to insert and delete the todos.
For this, first let's create a new file named queries.js where we'll store our graphql queries.
Paste the following content in the queries.js file.
import { gql } from "@apollo/client";
export const INSERT_TODO = gql`
  mutation InsertTodo($title: String = "", $userId: String = "") {
    insert_todos_one(object: { title: $title, userId: $userId }) {
      id
      title
      userId
    }
  }
`;

export const FETCH_TODOS = gql`
  query FetchTodos {
    todos {
      id
      title
      userId
    }
  }
`;

export const DELETE_TODOS = gql`
  mutation DeleteTodo($id: Int!) {
    delete_todos_by_pk(id: $id) {
      title
      id
      userId
    }
  }
`;
For creating the graphql queries, we can use Hasura Console.

Now, head to CreateTodo.js file to add the functionality to create a todo.
And add the following content.
import { useMutation } from "@apollo/client";
import { useAuth0 } from "@auth0/auth0-react";
import { useState } from "react";
import { FETCH_TODOS, INSERT_TODO } from "./queries";
export function CreateTodo() {
  const [title, setTitle] = useState("");
  const { user, isAuthenticated } = useAuth0();
  const [insertTodo, { loading, error }] = useMutation(INSERT_TODO);

  if (!isAuthenticated) return <></>;

  const handleSubmit = (e) => {
    e.preventDefault();
    insertTodo({
      //   auth0 stores userId in sub
      variables: { title: title, userId: user.sub },
      //   refresh the list of todos when the todo is inserted
      refetchQueries: [{ query: FETCH_TODOS }],
    }).then(() => {
      //  clear the input field
      setTitle("");
    });
  };
  return (
    <>
      <form onSubmit={handleSubmit}>
        <input
          type="text"
          value={title}
          onChange={(e) => setTitle(e.target.value)}
          placeholder="Todo Title"
        />
        {error && <pre>{JSON.stringify(error)}</pre>}
        <button type="submit">{loading ? "Creating" : "Create"}</button>
      </form>
    </>
  );
}
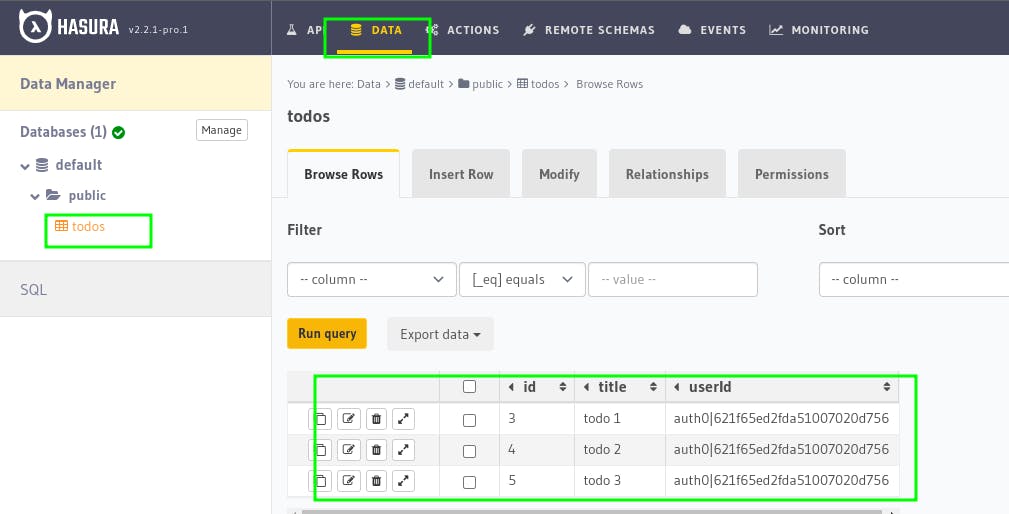
Now, try adding some todos, currently the todos, will not be visible, to check whether the todos are added or not, you can check it in Hasura Dashboard by going to Data > todos.
Now, let's fetch the todos and also add functionalities to delete them too.
For this, head to Todos.js file and add the following.
import { useMutation, useQuery } from "@apollo/client";
import { useAuth0 } from "@auth0/auth0-react";
import { DELETE_TODOS, FETCH_TODOS } from "./queries";
export function Todos() {
  const { data, loading, error } = useQuery(FETCH_TODOS);
  const { isAuthenticated } = useAuth0();
  const [deleteTodo] = useMutation(DELETE_TODOS);
  if (!isAuthenticated) return <></>;
  if (loading) return <p>Loading...</p>;
  if (error) return <p>Error Fetching Data: {JSON.stringify(error)}</p>;

  const onDelete = (id) => {
    //   delete the todo
    deleteTodo({
      variables: { id: id },
      //   refresh the list of todos when the todo is deleted
      refetchQueries: [{ query: FETCH_TODOS }],
    }).then(() => alert("Deleted"));
  };
  return (
    <>
      <h1>Todos</h1>
      <ul>
        {data.todos.map((todo) => (
          <li key={todo.id}>
            {todo.title}
            <button onClick={() => onDelete(todo.id)}>Delete</button>
          </li>
        ))}
      </ul>
    </>
  );
}
Now, our application is ready.
Let's see what we have built.
Useful Links
- Github Repo: github.com/projectashik/hasura-auth0-react